This online course is designed to take about 6 weeks to complete, but allows you 12 months' worth of access. In the course, Rosie teaches through step-by-step videos how to use your sewing machine and tools, as well as how to complete eight different clothing pieces for your 18" (think American Girl) doll. At the time of this review, the course costs $48, quite a reasonable price for all you receive. (The price may vary slightly due to exchange rates between the USA and Australia.) The course videos show you all the tools you will need (or would want) for completing the outfits, and gives you practice using them. Although I have been sewing for more than 35 years (yes, I really DID start when I was 4), even I learned about a couple notions that make life easier.

The Doll Clothes Video Course is designed for ages 8 and up. Arlene is 13, and has done some sewing for 4-H for the past few years. While this past experience DID help Arlene adapt some of her patterns (her doll is 15 & 1/2", not the standard 18",) previous experience is NOT necessary. It would be possible to adapt the program if you didn't have a sewing machine, but it would take a long, long time... so if you don't currently have a working sewing machine, I suggest you wait until you can borrow or purchase one!
From a parent's perspective, I love that Rosie shows each step in her videos. While I CAN teach Arlene everything I know about sewing...she doesn't always want to listen to me. If your child is really interested, it isn't hard to get them started.
On Rosie's website she has some great pointers that you *might* overlook...so let me tell you the short versions now. 1- if your doll is non-standard size, you can reduce the patterns on a copier, and save having to adjust them after they are cut out. 2- if you have a beginning sewer, buy some muslin (it's cheap) and let them practice each piece on it before moving to the nicer fabric you have pickedout for each pattern.
Because we are a sewing family (My Grandma was a Home Ec teacher & my Mom sews too,) we had almost everything we needed in the way of supplies. What we didn't have, we purchased using coupons at our local sewing store. It was quite convenient that they had wide felt on sale the week Arlene needed some for her pumpkin outfit! (You'll see a picture below.) We also purchased some brown knit for doll leggings, 1/4" elastic (because we ran out,) and a nifty notion called a looper.
When you download each pattern to print, it also comes with instructions that specify what material and notions (velcro, elastic, buttons, etc) you will need. We probably spent $10 total, but if you don't have any scraps lying around from previous projects, I would suggest a $30 budget for the 8 pieces. Be sure to look for sales or coupons...or ask your friends who sew! Lots of times, the amount needed for one of the patterns is a large scrap that your friends may be willing to donate.
When Arlene and I started watching the videos, a couple times she asked if we could skip ahead because the intro to sewing ones covered topics she already knew about. I let her skip some of them, and move ahead to the patterns. If you're not a proficient sewer already, please take the time to watch all of them, as Rosie has some great tips for 'extras' like using ribbon, buttons, and other fasteners, that you will truly benefit from. (Just two weeks ago, Arlene was instructing one of her co-workers ...an adult... on how to sew on buttons so they wouldn't keep coming off his coat! That's my girl! Her Great-Grandma would have been so happy to see that!)
So, are you interested yet?! I hope so! Because now you're going to get to see the cute outfits Arlene made for her doll. (Once the pattern is mastered, it is easy to make multiples in different fabrics. Arlene plans to make some as gifts for her friends with American Girl dolls.)
 |
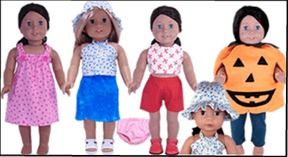
| This picture shows the pieces you will learn to make during the course |
The course starts with the simpler patterns and adds skills each piece. The first pattern is for sport shorts. The second makes a crop top (Arlene added some length to hers), and then you have your first complete outfit!
 |
| Ariel's photo shoot... |
 |
| This is how Ariel greeted me when I came home from work... in her new outfit! |
Then you move to the pattern for a 'sarong' (the doll version is easier than making one for a real person!) Next is a halter top to go with the sarong. By now you have completed 4 pieces and can begin to mix and match outfits!
 |
| Hula anyone? |
The fifth pattern is more difficult (but not overly so, remember there are step-by-step videos!) It is a pattern to make a summer nightie. This pattern could easily be adapted to make a jumper. The sixth pattern makes a hat. (I will admit, Arlene skipped this one because she had just crocheted her doll a hat and wanted to move on to the pumpkin outfit.)
 |
| This is the one outfit Arlene hasn't resized for Ariel. She plans to give this one away as a gift, and make a slightly smaller version with the same material. |
The seventh pattern is the most difficult, because it has the most steps. You will be making a pumpkin outfit, and leggings for your doll to wear underneath. This outfit wins the 'cuteness' award!
 |
| Pumpkin outfit, leggings, and her Arlene-custom-made hat |
The eighth pattern is for making underpants for your doll (one of those things that drive parent crazy, but kids don't seems to notice.) If your daughter just wants to go play at this point, make the underpants yourself!
 |
| Mix and match pieces... |
 |
| The skirt Arlene made with her newly-aquired skills |
 |
| The cape Arlene made with a pattern we already owned. It's great to see her using her skills! |
I know this course is designed for Moms and daughters to sew together. The reality in our house is that Arlene did not want to wait until I had time, so she made all the outfits herself. Then, she made other pieces with the skills she had learned! Arlene also made a pleated skirt to match her doll's top, and a cape from a pattern she found in my sewing room. If you're wanting something to do with your daughter, or you're been wanting to learn how to make doll clothes yourself, Rosie's is a great idea! The course would make a great gift.
 |
| Arlene & Ariel |
Overall, I give Rosie's Doll Clothes Patterns an A! Arlene thoroughly enjoyed making new outfits for her doll, and I saw an improvement in her skill level as she watched the videos. IF you live in a place where your internet is really slow, Rosie does have an option for purchasing the videos on a DVD. There is also an option to get your doll patterns to fit an 18 & 1/2" Cabbage Patch doll instead of the American Girl Doll size. The only drawbacks you need to know about are that Rosie is from down under (Australia) so she talks with an accent, and it takes a few seconds sometimes for the videos to load because your computer is talking to a server half-way around the world. The loading times were not long, but the accent sometimes made us laugh. When Rosie says "raw edges" it sounds like "roar edges" and we chuckled.
This has probably been the review labelled 'most fun' of this Crew year. If you would like to know how other Crew families fared on their Doll Clothes voyages, click the link below!


I love that pumpkin! So cute!! Wow she did a great job sewing, what a fun review :)
ReplyDeleteThose outfits are so cute!! GREAT job Arlene.
ReplyDeleteMaureen B (from the Crew)